.png)

Your store can run sensors and inspection software and still be unable to show who received the entrance spill alert, or what that person did once it hit their phone during the busiest shift of the week. A floor safety tech audit follows one hazard event from detection to a named response and retained evidence.
A slip-and-fall attorney may later use that trail to determine what the store knew and how it responded. Run every test in a way that keeps customers out of harm's way.
Step 1: Map the store’s actual hazard zones
Let traffic and recurring conditions shape the map. Walk the store itself. Don't work from a template. Start with entrances and flooring transitions, then add refrigerated-case leaks and pickup-area obstructions that appear and vanish by the hour.
Every zone needs a system and an owner. Next to the responsible role and backup responder, write down how the zone gets detected and how often it gets inspected. Flag any zone that leans on informal observation alone.
Arbill, citing CDC and Bureau of Labour Statistics material, attributes more than 60% of same-level fall injuries to the services, wholesale, and retail trade industries.
Those injuries become claims. When one does, a slip and fall lawyer handling a Florida or New York case will look for alert history and inspection records showing when the store knew about the hazard. Every step below builds that record.

Step 2: Inventory devices and applications with their clocks
Record each component’s operational state. One inventory has to cover the full stack: hazard sensors, inspection apps, cameras, and the alert platforms behind them. For each item, log its location, device identifier, and software version. Note the network dependency and the last time data synchronized successfully.
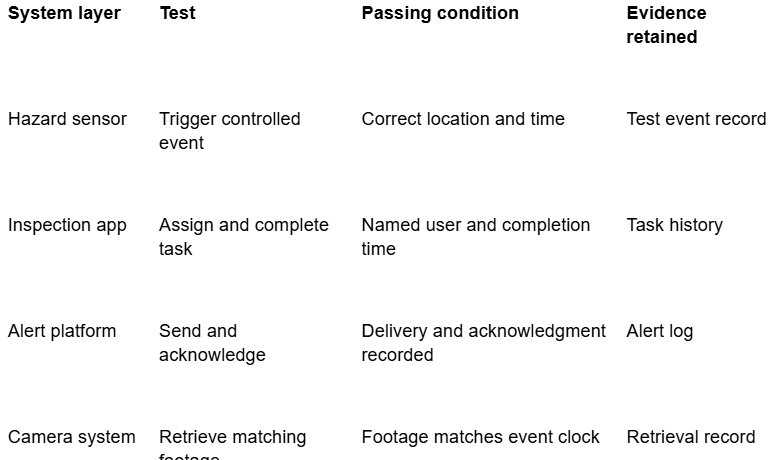
Trace the handoffs between systems. Send a test alert through each platform handoff, then safely disconnect a test connection and keep the failure logs.
Establish one time reference. Synchronize every clock against an approved time source. Write down time zones and daylight-saving settings so footage, alerts, and inspections line up when you match them.
Step 3: Set triggers that match store conditions
Define when the system should act. Scheduled triggers prompt inspections at set times, including opening and closing. Event triggers react to sensor readings or equipment alarms. When the weather turns wet, add scheduled checks.
Test for alert fatigue. People stop reading repeated warnings. Look for duplicate alerts and thresholds set so sensitively they trip on nearly any reading. Cut recipients who have gone inactive. Every store hazard alert should spell out an action, such as inspecting a self-checkout spill.
Step 4: Test routing and escalation under realistic conditions
Send the first alert to a named role. Make sure that person is at work, trained, and carrying a working device. Then withhold acknowledgment: leave the test alert hanging and verify it escalates to a second responsible person within the configured period.
Run a shift-change test. Trigger an alert mid-handover and confirm ownership changes without losing task visibility or history. Push it one step further: rerun the test with an absent recipient or a device left charging, and keep the backup recipient’s acknowledgment.
Retail TouchPoints covered QBE North America’s claims data from 2019 through 2022, which attributed 32% of midsize retailers’ insured losses to third-party slip, trip, and fall injuries.
Step 5: Reproduce silent and intermittent failures
Test devices without a connection. Complete a digital safety inspection offline, check local storage, then reconnect and verify the upload preserves both the event time and the synchronisation time.
Investigate missing tasks and conflicting records.
Confirm the employee’s assigned store and shift.
Check the connection and local queue of unsent records.
Compare creation and acknowledgment times with the completion time.
Review system handoff errors before recreating or closing tasks.
Do not silently recreate missing records. Keep the error record; a quiet recreation conceals the original failure.
Step 6: Review the evidence with a slip and fall attorney after an actual injury
Preserve the original records. Follow your approved incident and evidence preservation procedures. Put the relevant footage window and the floor inspection records under hold, unaltered. Alert histories and system access logs go in too.
Explain gaps; never fill them silently. Document missing footage or clock discrepancies, name the affected system, and describe your investigation steps. Do not backdate an entry or pass off an estimated time as precise.
If the injury becomes a claim, both sides examine that record. Comparative negligence rules can weigh the injured person’s own share of fault, and a documented response history is the store’s strongest material on that point.
The Evidentiary Challenges in Premises Liability Claims
Slip and fall lawsuits often stall when missing evidence fails to clarify how long a dangerous condition existed, who knew about the spill or obstacle, or whether management acted promptly. In discovery, your lawyer reviews the facility's digital and physical records, matching automated alerts, floor inspection sweeps, camera footage, and employee statements to the exact time of the fall. This timeline reveals whether store management failed to uphold its legal duty to maintain a safe environment.
When should I call a slip and fall lawyer?
Consider calling promptly after an injury if you need legal advice, because footage and other records may be overwritten under routine retention schedules. A lawyer can request preservation and explain the deadlines and legal standards that apply in the relevant jurisdiction.
How to choose a slip and fall lawyer
Focus on hiring an attorney with specific premises liability experience and a firm strategy for securing digital records, such as store audit logs and security camera footage. You should also discuss legal fees directly during your consultation. Personal injury firms generally handle claims on a contingency basis, collecting no legal fees unless they secure a recovery, though exact fee percentages, out-of-pocket litigation expenses, and repayment conditions vary by retainer agreement.
Step 7: Require proof that every alert produced a response
Define the audit trail. Connect the event and its location to the recipient’s acknowledgment. Document the action and closure, plus any reassignment or escalation history.
For a service-counter leak, that means cleanup evidence and a recorded floor check before closure.
Sample records; do not trust a dashboard total. Pull samples from different stores and shifts, including devices tested offline. Open the underlying records and match dashboard statuses against timestamps and user activity. Fail any delivered alert that lacks evidence of a completed response.
No response record, no pass.
Make the audit repeatable
Retain the test plan and its failed scenarios, along with corrective actions and follow-up results, under approved policies. Assign an owner and a retest deadline to every unresolved defect. Repeat affected tests after software updates or staffing changes, and link the earlier failure to its successful retest. Every sampled event should end with a name attached and a record you can pull.


Comments (0)
No comments yet.